Please be respectful and give them the required time to complete their establishment process. Keeping your carts away from the new tees, and out of the newly sodded areas surrounding them, will make a tremendous difference. Your help and cooperation is much appreciated by the grounds staff and golfing membership.
Tuesday, September 30, 2014
Tee Renovation Project Complete
Sunday, September 21, 2014
Fairway/Approach Fall Aerification
Goal-
A healthy stand of grass naturally recycles organic matter into the
upper soil profile of the fairways/approaches when roots, shoots,
stolons, and other plant parts are replaced throughout the season. This
organic matter accumulation must be removed with core aeration. When a
significant layer of thatch and organic matter develops, the surface
becomes "spongy", holding water and creating other issues related to
plant health and disease susceptibility.
Process-
1. Fairways/Approaches are punched with 7/8" tines on 2"-3" spacing, 5" deep, removing a significant amount of material and leaving one heck of a mess on the surface.
2. Plugs are allowed to dry slightly on the surface before they are broken apart with a large drag, removing the soil from the organic layer.
7. Final cleanup preparations are performed and debris is cleaned up in specific locations where the blowers and vaccum didn't clean to a desired level.
Finished Product-
Take Home Message & Benifits-
Aerification of Turfgrass is a necessary evil (cultural practice) to maintain healthy plants. Benefits are Thatch Control, Compaction Relief, Beneficial Air and Gas Exchange to the root zone, Improved water movement, Greater nutrient penetration, Increased shoot and root growth, Improved soil structure... All vital to a healthy stand of grass. The medicine (Aerification) does not always taste good, but a healthy patient (Grass) is worth the effort and inconvenience. It is always our goal to make aerification as painless as possible.
Short Videos Showing the Fairway Aerifyer In Action
Saturday, September 20, 2014
Tee Project - Week 2 Update
The tee box renovation project is progressing along better than expected on this second week and we can see the light at the end of the tunnel now, with construction nearing the final few tee box locations. Weather has been fantastic this past week and the crew made huge progress with the dry and cool temperatures. We now have 14 tee boxes completed and seeded with only 7 left to complete. The construction crew is doing a fantastic job on all the many details related to the scope of the project and leaving behind virtually no damage to the course.
#3 Back Tee
#2 Forward Tee
#1 Forward Tee
#10 Forward Tee
#8 Forward Tee
#8 Back Tee
#17 Forward Tee
#18 Back, Middle, Senior (New), Forward
#16 Forward Tee
Wednesday, September 10, 2014
Tee Project - Week 1 Update
With a very productive first week of construction in the books, things are really starting to take shape on the first 10 tee boxes of the tee renovation project. The weather has created several challenges already, haulting work on two days and delaying work on two others with heavy rainfall and wet conditions. The construction crew is doing a fantastic job and making huge progress, working sun up to sun down 7 days a week and leaving behind very minimal disruption to the golf course.
#7 Forward Tee
#12 Forward Tee (New)
#14 Back Tee
#9 Back, Middle, Senior (New), Forward Tees
#11 Forward Tee
Construction Equipment Arrives On Site
Tree Removal At #9 Back & Middle Tees
Tree Removal At #18 Back & Middle Tees
Sunday, August 31, 2014
Proper Driving Range Divot Patterns
When practicing from the driving range tee, it is important to remember the proper divot patterns that are recommended. Spreading divots around or taking divots in strips with undisterbed turf between, is the preferred method we ask that you use.
Leaving small areas of turf between divots, will provide a much faster recovery time to the teeing area. When a large hole of concentrated divots is created, this requires a much longer recovery time with no remaining turfgrass plants within the area, to aid in recovery from the inside out. This situation requires the damaged area to only recover from the grass seed/sand that's applied by the grounds staff, while the single divots or strips are immediately filling in from the sides and healed much faster.
Large hole divots suffer from erosion and heavy rainfall, washing the seed/sand out with no remaining turf to stabilize area or help it re-establish. Mowing equipment will also essentially push or scoop sand from the large holes as the cutting units pass over the uneven surface, ultimately delaying recovery of that particular teeing location.
We appreciate your help when it comes to the health of the practice area turf and keeping the driving range tee/shortgame area in good condition. Continuing to educate members and your peers on the proper divot taking methods will keep the turf recovering consistantly throughout the golfing season, always providing a quality surface to practice from.
Wednesday, August 27, 2014
Tee Project Planning Meeting
Finalizing Plans, Equipment, Irrigation and Material Staging Areas
Laying Out New Forward Tee On #1
Marking Correct Tee Box Locations From Site Plans
#7 Forward Tee Laid Out For Expansion
Laying Out New Forward Tee On #17
Tuesday, August 26, 2014
How-To Divot Repair
(1)
Large Divot With Soil Still Attached-
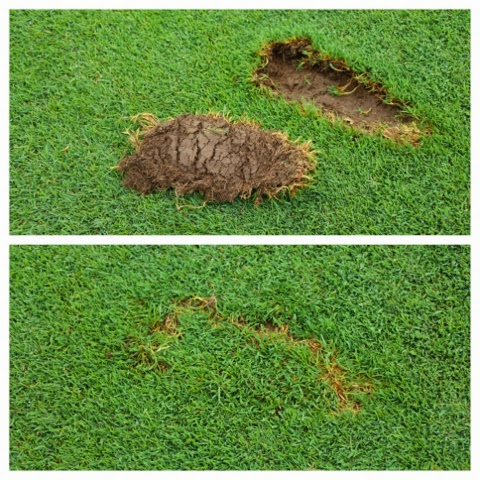
When a divot is taken from a fairway or a tee box and the soil is still attached like the picture above, the divot should be placed back into the hole and in the same shape it was removed from. When soil remains attached with some root structure in tact, the divot will continue to grow without drying out. When there is minimal soil attached or it's blown apart like the picture below, the divot will simply not survive and will ultimately be removed and re-filled by the grounds staff... Delaying its recovery tremendously!
(2)
Small Divot Blown Apart In Pieces-
When your divot is small or maybe blown apart into a bunch of small pieces, this is when you grab the provided green sand bottle for repair. The small pieces, even replaced very neatly will not survive, due to the lack of root structure and ability to stay moist for reestablishment. When repairing your divot with green sand, please fill the damaged area completely so that the sand is flush with the surrounding turf and tap down with your shoe. The pictures below show divots that were repaired with green sand and recovering very nicely from the outside edges in, while plants also establish inside the damaged area for full recovery of the divot location.
Take Home Message
Subscribe to:
Posts (Atom)