Sunday, August 31, 2014

Proper Driving Range Divot Patterns

When practicing from the driving range tee, it is important to remember the proper divot patterns that are recommended. Spreading divots around or taking divots in strips with undisterbed turf between, is the preferred method we ask that you use. 

Leaving small areas of turf between divots, will provide a much faster recovery time to the teeing area. When a large hole of concentrated divots is created, this requires a much longer recovery time with no remaining turfgrass plants within the area, to aid in recovery from the inside out. This situation requires the damaged area to only recover from the grass seed/sand that's applied by the grounds staff, while the single divots or strips are immediately filling in from the sides and healed much faster. 

Large hole divots suffer from erosion and heavy rainfall, washing the seed/sand out with no remaining turf to stabilize area or help it re-establish. Mowing equipment will also essentially push or scoop sand from the large holes as the cutting units pass over the uneven surface, ultimately delaying recovery of that particular teeing location.

We appreciate your help when it comes to the health of the practice area turf and keeping the driving range tee/shortgame area in good condition. Continuing to educate members and your peers on the proper divot taking methods will keep the turf recovering consistantly throughout the golfing season, always providing a quality surface to practice from.

Wednesday, August 27, 2014

Tee Project Planning Meeting

Today we had our pre project planning meeting for our upcoming tee box renovations. This was a great opportunity to meet again with architect Chris Wilczynski and Contactor Chris Furness with Great Lakes Golf & Site Development, Inc. Both of these guys are fantastic and so very creative when it comes to golf course design and construction. We are all getting excited as the project starts in just 6 days now!

We finalized the plans for the 10 new forward tees and laid out the new tee box locations with paint and flags. The new forward tees will be a wonderful addition to the golf course and a much needed addition for the women, seniors and higher handycappers. 

We also laid out the 8 existing middle and back tees that will be expanded and leveled. The new renovated tees will provide more teeing ground with better alignment with the hole and more variation in yardage for golfers of all skill levels. 

Finalizing Plans, Equipment, Irrigation and Material Staging Areas
 
Laying Out New Forward Tee On #1
 
Marking Correct Tee Box Locations From Site Plans

#7 Forward Tee Laid Out For Expansion
 
Laying Out New Forward Tee On #17

Tuesday, August 26, 2014

How-To Divot Repair

With the busy golfing season in full swing, this is a good opportunity to discuss divot repair and how we can all do our part daily to keep Gull Lake C.C. in pristine condition. Filling divots in fairways and tees is very simple and only takes a couple seconds, with very minimal impact on your round of golf. The grounds team spends a fair amount of time each week filling divots in fairways, while divots on tees are repaired everyday throughout the golfing season. We have provided some tips below on getting your divots filled properly depending on the extent of the damage to the turf and what condition the divot piece remains in.

(1)
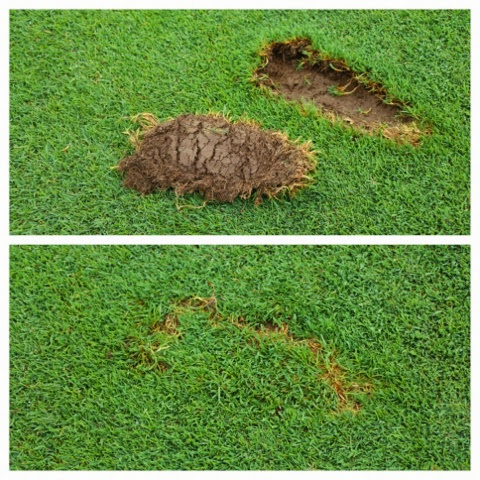
Large Divot With Soil Still Attached- 
When a divot is taken from a fairway or a tee box and the soil is still attached like the picture above, the divot should be placed back into the hole and in the same shape it was removed from. When soil remains attached with some root structure in tact, the divot will continue to grow without drying out. When there is minimal soil attached or it's blown apart like the picture below, the divot will simply not survive and will ultimately be removed and re-filled by the grounds staff... Delaying its recovery tremendously!

(2)
Small Divot Blown Apart In Pieces-
When your divot is small or maybe blown apart into a bunch of small pieces, this is when you grab the provided green sand bottle for repair. The small pieces, even replaced very neatly will not survive, due to the lack of root structure and ability to stay moist for reestablishment. When repairing your divot with green sand, please fill the damaged area completely so that the sand is flush with the surrounding turf and tap down with your shoe. The pictures below show divots that were repaired with green sand and recovering very nicely from the outside edges in, while plants also establish inside the damaged area for full recovery of the divot location.

Take Home Message
Properly repaired divots will heal up much faster than a divot that's either left unreparied, or simply sprinkled with green sand like salt on a steak. We have provided extra green sand bottles for you at the Pro Shop and by #10 tee, for those that need to reload at the turn. By all doing our part to repair divots and ball marks properly, the course will remain in better shape and the damaged areas will be repaired sooner.

Friday, August 22, 2014

Greens Rooting & Needle Tine Benifits

The greens have been in fantastic condition and very healthy this summer, despite the challenging environmental conditions Mother Nature has dealt us. Overall, this summer has been normal or below average temperature wise, and we have only recorded a few days over 90 degrees at the club so far this season. The main challenges for the turf this summer has been heavy rainfall events with hot and humid weather conditions following for a week at a time. The greens have battled through the stressful periods of this summer season in fine fashion so far, with the help of routine needle tine venting and our aggressive cultural practices. Opening up channels for roots to breath and allowing the rootzone to rid itself of harmful gasses, makes all the difference in the world. Getting oxygen to the root system through needle tine venting, allows us to keep the greens in championship form throughout the stressful summer season.

Members ask from time to time... "Why do we punch small holes into the greens periodically during the summer?" Routine needle tine venting greens throughout the summer months has some wonderful benefits and there is a perfect example pictured above. The beautiful, white, healthy roots headed south into the rootzone, thriving in an oxygen rich environment and loving life.

Step by Step Greens Needle Tine Aerification Process

For more information on the needle tine process. Click Here

Monday, August 18, 2014

Topdressing & Needle Tine Venting

This morning the grounds team was very busy at the club before the normal Monday outing, mowing the entire golf course, filling divots on driving range tee/short game practice area, topdressed greens, needle tine vented greens, blew sand into open holes and rolled greens two times. With a busy club championship week behind us now for the golf course and the turf, this very productive morning has the course back in fantastic condition and ready for league tomorrow. 

Applying sand to the greens prior to venting.

After topdressing and needle tine venting.

After sand is blow into holes and double rolled.

Driving range tee dialed up and ready for action.

Today the grounds team did a fantastic job mowing and completing a bunch of detail jobs on a beautiful maintenance Monday. The remainder of the open needle tine holes will be closed after a double cut and roll tomorrow morning, leaving behind virtually no sign and a healthy putting surface that will be rolling firm and true.

For more information and the health benefits of needle tine venting. Click Here

Friday, August 8, 2014

Irrigation Head Blowout

We had a pretty wild irrigation blowout on #5 fairway this afternoon. A fairway blower, somehow cracked an irrigation head off its swing joint and created some excitement amongst the grounds staff for a few minutes. 

The leak was turned off within 5 minutes with minimal damage and was repaired within the hour.

This is one of those "freak" accidents that is very uncommon, but usually happens on Friday when the course is busy and the weather is perfect.

One hour later you couldn't tell anything had happened with a beautiful repair by the grounds team.

Tuesday, August 5, 2014

Tee Renovation Project


Dear Members & Friends,

With summer and the golfing season in full swing, it’s time to discuss our upcoming golf course tee project that’s scheduled to start September 2nd. As many of you already know, the club has been working with golf course architect Chris Wilczynski now for the past 4 seasons. For those of you that don’t know, Chris is a disciple of Art Hills and worked 20+ years for Art’s firm, designing golf courses all over the world. Chris enjoys our golf course and shares many of the same visions Art Hills had for our course back in the early 90’s. The first phase of our masterplan project was to remove all the dead and or dying trees from the golf course, essentially cleaning up the pallet. Now that we have a decent handle on the tree situation, it’s time to complete the next phase towards the completion of our masterplan vision for Gull Lake C.C. and our wonderful golf course.

The golf and grounds committees have been actively working along side the architect for the past year, planning out and tailoring the tee renovation project to fit our needs as a club. The main initiatives for this tee project were to create several new forward tees for women and seniors along with expansion/leveling of several other existing tee boxes. The golf course is becoming dated and needs to be updated and modernized in several locations, to benefit golfers at all skill levels. While this project is going to be a nice update to the golf course, it is going to come with a small disruption to play for a period of time. We will be cutting temporary tee box locations in the rough or placing tee markers at the beginning of the fairway on holes under construction. This will only be a small disruption to your round of golf, as the rest of the golf course will remain in fantastic condition as always.

Scope of work:
#1 – New forward tee at beginning of fairway on Right.
#2 – Expand existing forward tee by three times the size.
#3 – Expand and Level existing back tee.
#7 – Expand and Level existing forward tee.
#8 – Move existing back tee 15’ Right and add new forward tee near beginning of fairway.
#9 – Expand and realign all three existing tees.
#10 – New forward tee at beginning of fairway on Left.
#11 – Expand and Level existing forward tee.
#12 – Expand and Level existing back tee with cart path and add new forward/middle tee.
#14 – Expand and Level existing back tee.
#16 – Expand and Level existing forward tee.
#17 – New forward/middle tee near beginning of fairway.
#18 – Expand and Level existing middle and back tees.

The project is scheduled to begin on Tuesday, September 2nd and will be completed in one month if all goes as planned and Mother Nature cooperates. If everything goes perfectly here is what you can expect during and after the completion of the tee project. While this is a fairly large project, we plan to keep disruption to golfers and haul roads to a minimum during the time of construction. The tee box surfaces are going to be seeded to bentgrass upon completion of grading/shaping each tee box and the tee banks will be sodded with new bluegrass rough sod. The bentgrass seed on the tee boxes will require some establishment time and patience as it matures and fills out into a dense stand of turf. We hope to have the new and renovated tees open next season by Memorial Day if we have good growing conditions this fall and next spring. It’s very important that we take advantage of the warm ambient/soil temperatures the first half of September, getting the bentgrass seed germinated and growing. The seed needs this time to establish in order to stay healthy through the winter and finish establishing come spring without a delay.

We are very excited about the vision for the golf course here at Gull Lake C.C. and the completion of this tee renovation project this season. This tee project will come with minimal disruption to the property area as a whole during construction and we hope you will embrace the improvements to your wonderful golf course.

Regards,

Jesse Shaver
Grounds & Facilities Superitendent

Greens Brushing & Topdressing

 
This morning we took advantage of the beautiful weather before the outing, to double cut the greens with brushes in opposing directions and applied a light topping of sand. The greens are double cut daily here at GLCC and we typically mow with brushes down a minimum of three days each week throughout the summer golfing season, as part of our normal greens maintenance program.

Brushing is a non aggressive means of grooming the surface of the greens during the heat of the summer, eliminating grain and tightening the putting surface with minimal injury inflicted on the plants, when more aggressive cultivation is not recommended. This operation can be thought of much like combing out your hair before it's cut to length each time.

After the greens were mowed and brushed in two different directions this morning, we applied their light weekly sand topping. Topdressing helps to dilute thatch and organic matter, while smoothing the putting surface for fantastic ball roll distance and increasing the greens ability to accept a shot. 

The finished product today on greens looks outstanding, leaving the turfgrass plants happy and healthy! After a double cut in the morning and a dry roll in the early afternoon tomorrow, the greens will be rolling well for league and the week ahead.

The crew did a fantastic job today, mowing the entire course and completing many detail jobs before the outing started. Well done Team!!!